Decisions, decisions. What to do and how to do it?
I have been doing some rearranging in my sewing room. I just couldn't "see" the fabric that I have because it is all in tubs and plastic drawers. I have decided to take some of it out and put on shelves so I can see it. I am trying to come up with a way to organize the bits and pieces so I can use them in a quilt.
I have been searching pinterest and the internet sites and really just haven't come up with a really good solution to my problem. I have a 5 ft tall metal shelving unit that is full of books that I really don't need any more. I am thinking of putting them on etsy or ebay. What do you guys think?
I read where a lady bought the cardboard for comics to wrap her fabric around. Since I am trying to be very frugal and use what I have or not spend much money, I went to the USPS and picked up a few of their large priority boxes. Once cut where all the folds are they are the perfect size for wrapping up my yardage fabrics with no waste of the box. I guess if you want you could go through the dumpsters or ask at the stores when they are emptying boxes. I found it was to cumbersome and difficult the get the sizes I wanted. Plus I spent a lot of time cutting and not doing what I wanted to do, organize.
A couple of years ago I went through a bunch of my patterns that no longer came close to fitting me. Some of them were 70's style and vintage 50's that I had aquired. I met this young lady that liked vintage style clothes so I gave her all those patterns. I did keep about 3 or 4 that were Vogue and designers. I have all the patterns I left organized in almost perfect fit plastic stackable drawers. It makes it very convenient to find a pattern. The only problem here is I can't get to them because of the tubs of fabric that I have collected over the years are in front of them. Some of the fabric is clothing that I wanted to make something out of long ago and don't remember what now. What should I do with it? Keep it, donate it? I'm sure most of you know how hard it is to let go of your stash. I also have some vintage fabric (pieces) I got from a friend and I'm not sure what I want to do with them either.
I welcome your help and ideas, any suggestions or tips ya'll would like to leave would be a great help.
Tuesday, February 19, 2013
Thursday, February 14, 2013
Still Ripping!
Oh my GOSH! I am still ripping. I got the quilt sewn back together and what I felt was squared up to the best of my ability. I worked very hard to make sure that all the layers were nice and flat, no wrinkles. Then pin pin pin. Marked the center quilting area in a diagonal pattern with a yard stick, ruler and chalk. Quilting that went really well and fairly easy. Surprise!
Ugh, then I started on sewing around the borders. I "thought " I had done a pretty good job until I started doing the FM stars and loops on the larger outer boarder. My border started to lump. Take it out of the machine and look at the back. I couldn't believe what I saw. Wrinkles and lumps everywhere from sewing around the borders. So I ripped and ripped. Put it back on the board and stretched it as best as I could. This time I used spray glue. I love this stuff. I used it on Tyler's quilt with no pins whatsoever. I had minimum wrinkles to adjust while quilting it.
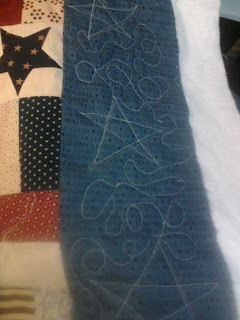
Using the spray glue for basting worked. I got around the borders with minimum wrinkling underneath. So I am now ready to get back to FM on the large border. So...what do you think? I space out the stars with a ruler, then freehand them with chalk. Do the swirls and loops up to the star and very carefully do the star, come back the beginning and work my loops over to the other side of the star and on to the next star. I actually think it worked out pretty good, so far.
Ugh, then I started on sewing around the borders. I "thought " I had done a pretty good job until I started doing the FM stars and loops on the larger outer boarder. My border started to lump. Take it out of the machine and look at the back. I couldn't believe what I saw. Wrinkles and lumps everywhere from sewing around the borders. So I ripped and ripped. Put it back on the board and stretched it as best as I could. This time I used spray glue. I love this stuff. I used it on Tyler's quilt with no pins whatsoever. I had minimum wrinkles to adjust while quilting it.

Wednesday, February 13, 2013
The Alphabet Walk
 |
| 2012 Handmade Christmas |
These are made with fabric, fleece, sewn around the edges and can be thrown in the washer when dirty. I found similar sets on Etsy costing mega bucks $30-$50. Making them is somewhat time consuming. So I can really understand why they cost so much.
I was waiting to publish this until I had a little more to write about. But, my brain isn't thinking clearly lately. So, on with the blog.
Monday, February 4, 2013
Rip, Rip, Sew, Rip
Rip, Rip, Sew, Rip. That's what I've been doing for days now. After deciding to remove the outside border of the "Buckaroo Stars" quilt and measuring it, I found that I needed to remove all the borders surrounding the main part of the quilt. I measured everything that I could possibly be measure so when I got ready to start adding the borders back on it would all match and be even.
I did remember when I had originally made this quilt I had made it unusually long for a queen size quilt. I took off two rows of blocks. In doing so I ended up removing two of the stars. I had to remove two squares in different places to put the two stars back in the quilt. My original goal when starting this quilt was to have fifty stars representing all 50 states in the quilt which meant I had to add about 30 more stars to the original pattern. While the quilt is in pieces, I noticed that I had accidentally put some of the same squares right next to each other. Something I hadn't notice before. I have taken the time to remove those pieces and replace them with other squares. It is slowly coming back together and looking like a quilt should.
While visiting another quilter's website http://lalaslovelys.blogspot.ca/ I saw the back of Lala's Lovely quilt back. It looked so neat and pretty I thought at first it was the front of the quilt. I looked at mine and decided that I had better do some trimming of some threads and press it. OK a lot of the threads. Not as good as hers but it does look better than it did.

 |
| Rhea's quilt in pieces. If she saw this she would probably call me nuts. |
While visiting another quilter's website http://lalaslovelys.blogspot.ca/ I saw the back of Lala's Lovely quilt back. It looked so neat and pretty I thought at first it was the front of the quilt. I looked at mine and decided that I had better do some trimming of some threads and press it. OK a lot of the threads. Not as good as hers but it does look better than it did.

Sunday, February 3, 2013
Tools of the Trade- Starch
I have decided to write a couple of posts about the tools we as sewers use most often and those that make our sewing lives much easier. Today we have more tools and gadgets to use during sewing than those of our parents or even when some us began in the 60's.
Starch. Do you use starch during your sewing or quilting? I have only just started using starch since I have started quilting. I rarely if ever used it while making clothing or other projects like stuffed animals or dolls. I am not a starch person. It's just one more step I like to avoid so I can keep on sewing.
I am most familiar with canned spray starch. My mother bought Faultless, Niagara, EasyOn what ever was on sale. I grew up using spray starch on clothing after they were washed and dried before permanent press and everyone had a dryer in their home. I even remember ironing my dad's undershirts for work, but I digress. I have found that with canned spray starch it leaves a glossy residue on my cotton fabric and eventually gums up the iron. It doesn't seem to matter as to which brand you use they all seem to gum up the nozzle so it doesn't always spray in a nice even spray but instead squirts out a big mess or foams up all over the can even if the nozzle has been cleaned with hot water. The cost varies from .97 to $1.50 per 20oz can depending on where you by it. While writing this I have also found out Niagara has a non aerosol bottle brand. Might look into it sometime. Next in line is powder starch.

I remembered my grandmother using starch from a bottle. You know the type it's in the coke bottle with an aluminum shaker and cork stopper. It sits in the frig until ready to use. After sprinkling the clothes, she would wrap up the clothes and put them in a plastic bag in the frig to be ironed at a later date. I believe she mixed the starch herself. I found out from a past pick up and delivery job I had several years ago that dry cleaners use 25 lb bags of powdered starch. I have no clue as to how it was mixed and used. I searched the local grocery stores and found Argo Starch a powdered starch that you could mix either by cooking it or mixing it with hot water. I tried the cooked method first figuring the starch would dissolve better in boiling water. I ended up with a rather thick paste that I diluted down and put in a spray bottle and the rest in the frig. It can be diluted to not be so heavy a starch. I found that it spoils quicker than I was using it as I never returned the bottle to the frig after using it. I tried the hot water method and found that I had to shake it up really really well before using. This method still left shiny spots on my fabric. When looking at the box closer it actually says it's "glossy". I believe this is also the starch she used on her crochet to make the really pretty hats and baskets that sat on the dressers or tables. The cost of this box is about $1.80.
I found Mary Ellen's Best Press non-aerosol spray starch @ 7.95 for a 16 oz bottle. She has several scents to chose from. I chose the unscented brand as everything these days has some kind of fragrance added to it. Sometimes all those smells can be nose numbing and give those of us that are scent sensitive headaches. I like her starch. In fact I have bought it twice. I like it, but geesh it is expensive if you use it liberally and I like to use it liberally. The shiny spots are also minimal and my 15 y/o Rowenta didn't get gummed up as much. I did find that the fabric just wasn't has stiff as I would have liked it to be.
Last on the list of starches and my favorite I have used thus far is Sta-Flo liquid concentrate at $2.92 for a 64 oz bottle. I found this very easy to mix and pour into a non-aerosol bottle. If I want a really stiff piece of fabric I can add just a little more to the bottle. So far the only real problem I have found is the spray bottle I use does not have as fine a spray as I would like. So I end up having areas with no spray on it. Once I have sprayed the spots I missed I let it sit for about two or three minutes. This allows for the starch to soak in to the fabric. I iron my 100% pieces of cotton on high with no steam on the back. That way if I should get some shiny spots or flaking it won't be on the finished side of the fabric. I should mention that since I allow the fabric to sit and soak in the starch I have very little residue left on my fabric or my iron. Which is good because it saves me from having to clean my iron when I am really busy pressing and sewing.
Subscribe to:
Posts (Atom)